
How to Install Blender
Blender is the three-dimensional modeling application used by 57 Studios™ for every custom mesh that appears in an Unturned™ mod. This reference covers the complete installation procedure on Windows, including the decision between the Long-Term Support release and the current release. The procedure assumes a clean Windows installation with administrative privileges and an active internet connection.
This article is written for a reader who has never installed Blender before. Each step is described in full, including the visual cues that confirm the step has been completed correctly. The goal is to produce a working Blender installation that opens without errors, displays a viewport with the default cube, and is ready to be used in the following articles on viewport navigation and FBX export.
Prerequisites
Before beginning this article, the following must be true:
- A Windows 10 or Windows 11 computer with at least eight gigabytes of system memory.
- A graphics card that supports OpenGL 4.3 or higher. Almost every graphics card manufactured in the last ten years meets this requirement.
- At least three gigabytes of free disk space on the drive where Blender will be installed.
- An active internet connection capable of downloading a file approximately 300 megabytes in size.
- Administrative privileges on the Windows account performing the installation.
- A web browser. The default Microsoft Edge installation that ships with Windows is sufficient.
- A folder where the downloaded installer can be saved. The default Downloads folder is acceptable.
What you'll learn
By the end of this article, the reader will be able to:
- Navigate to the official Blender download page.
- Distinguish between the Long-Term Support release and the current release.
- Select the correct Windows installer for a 64-bit system.
- Complete the installer using default options.
- Confirm that Blender has installed correctly by launching it for the first time.
- Identify the default scene contents and confirm the viewport is rendering.
- Locate the user preferences folder for future configuration work.
- Verify the installed version number from the splash screen and from the About menu.
Background
Blender is developed by the Blender Foundation, a nonprofit organization based in Amsterdam. The software is distributed under the GNU General Public License, which means it is free to download, free to use commercially, and free to modify. There is no trial period, no license key, and no account registration step.
The Blender Foundation publishes two parallel release tracks. The current release contains the newest features and the most recent bug fixes. The Long-Term Support release, known as LTS, freezes feature development at a specific version and only receives stability fixes for two years. For Unturned modding work, either track is acceptable, but the LTS release is recommended for new modders because it minimizes the chance that a tutorial or a community guide will reference a feature that has moved or been renamed.
The Blender Foundation is funded through the Blender Development Fund, a program that accepts monthly contributions from individuals and corporations. The development fund supports the core development team and pays for the infrastructure that hosts the download mirrors. The 57 Studios documentation does not require a contribution to the development fund; the download remains available to anyone with an internet connection.
Pro tip
The LTS release is the same release that professional studios use when they need a stable, predictable version that will not change unexpectedly during a long project.
A short history of Blender
Blender began as an in-house tool at a Dutch animation studio called NeoGeo in the late 1990s. When the studio closed, the original developer, Ton Roosendaal, raised funds from the user community to release the source code under an open-source license. The result was the Blender Foundation, which has stewarded the project ever since. Every modder using Blender today benefits from a quarter-century of continuous development funded primarily by community contributions.
Step-by-step installation
Step 1 — Open the official download page
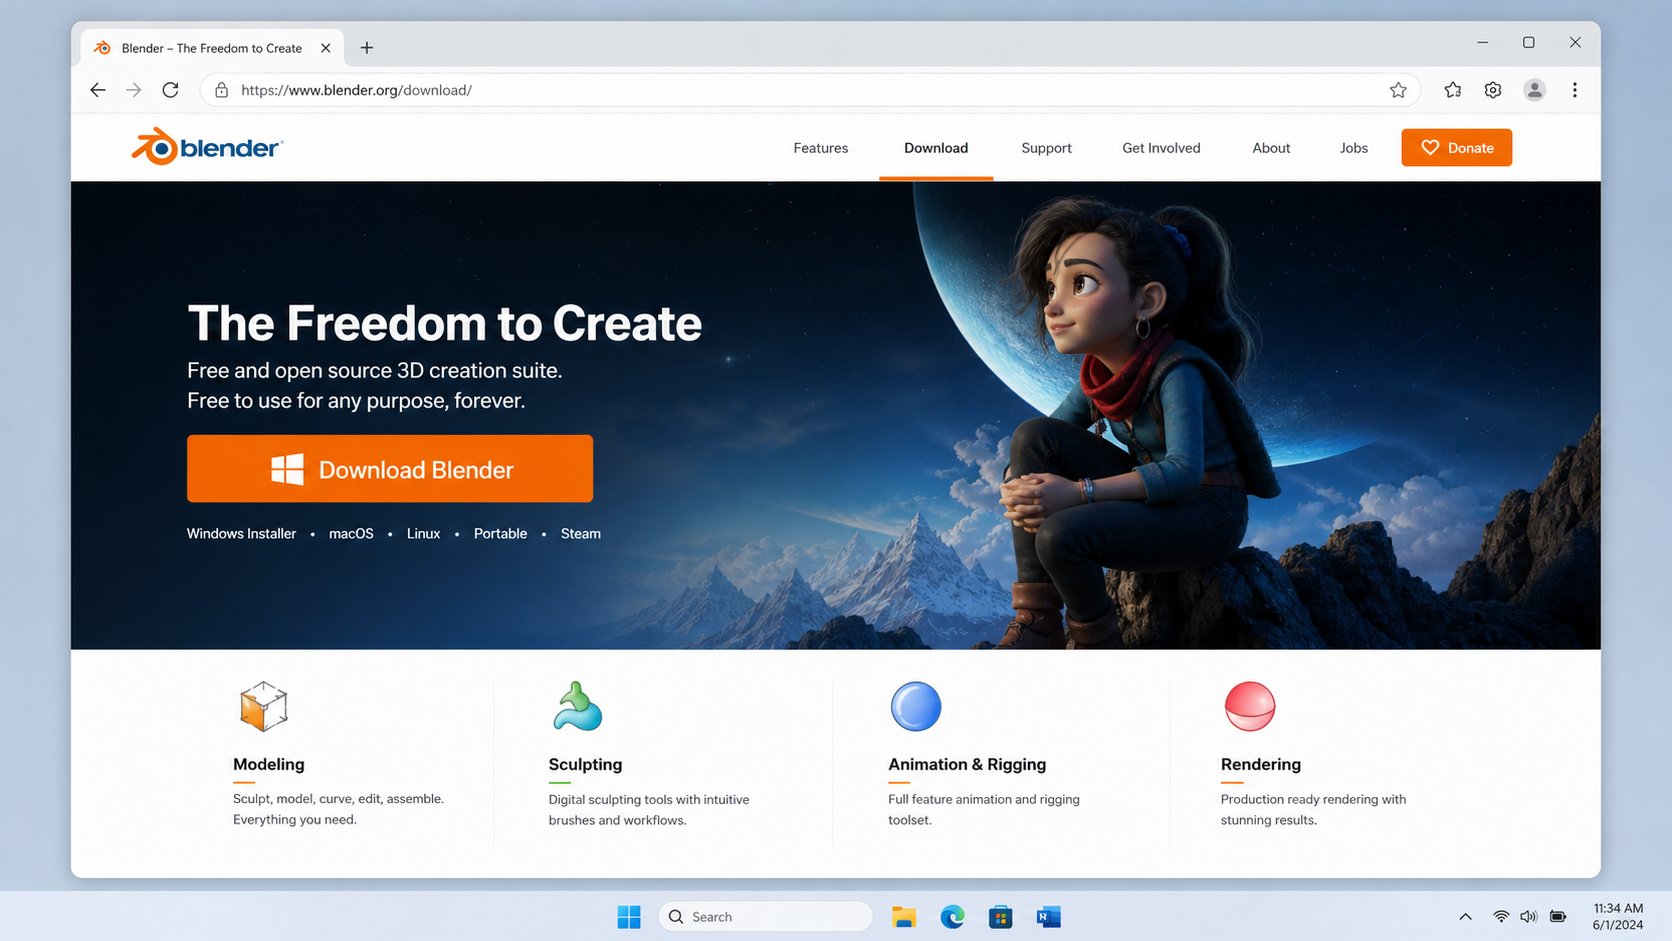
Open a web browser and navigate to https://www.blender.org/download/. This is the only source from which Blender should be downloaded. Third-party websites that offer Blender installers are not authorized distributors and may bundle unwanted software with the installer.
The download page automatically detects the operating system and presents the correct installer at the top of the page. On a Windows computer, the large blue button will read "Download Blender" followed by a version number.
Verify the source
The official Blender website is blender.org. Any other domain claiming to host Blender is unofficial. Always verify the address bar reads https://www.blender.org/ before clicking any download button.
Why a fresh download every time
Blender updates frequently, and the version on the download page is always more current than any installer that has been sitting on a hard drive for more than a few months. For a new installation, always download the installer fresh rather than reusing an older copy. Older installers may install a version that has known bugs which have since been fixed in a point release.
Step 2 — Choose between LTS and current
Below the main download button, the page lists alternative releases. The Long-Term Support release is labeled "LTS" and will have a version number lower than the current release. For example, the current release might be Blender 4.5 while the LTS release is Blender 4.2 LTS.
The following comparison shows how the two tracks differ:
| Aspect | Current release | Long-Term Support (LTS) |
|---|---|---|
| Feature additions | Frequent, every quarter | Frozen at release |
| Bug fixes | Continuous | Critical fixes only |
| Support duration | Until next release | Two years from release |
| Recommended for | Advanced users tracking new features | New modders, long projects |
| Risk of workflow changes | High | None |
| Community tutorial coverage | Newer features may lack tutorials | Mature feature set with deep coverage |
| File compatibility | Forward-compatible | Stable within the LTS line |
| Typical version gap | Latest | One to two minor versions behind |
| Add-on compatibility | Mixed; some add-ons lag the release | High; add-on authors prioritize LTS |
| Plugin developer support | Best for cutting-edge add-on testing | Best for production add-on use |
For a new modder following the 57 Studios documentation, the LTS release is the correct choice. The screenshots in this knowledge base were captured against the LTS release.
Pro tip
A second LTS release is published each year, so the LTS version visible on the download page in March is not necessarily the same LTS version visible in October. The 57 Studios documentation tracks whichever LTS release was current at the time the screenshots were captured, and the version is noted in each article's footer where it matters.
Step 3 — Download the Windows installer
Click the download button to begin the download. The file is named in the format blender-<version>-windows-x64.msi and is approximately 300 megabytes. The download will save to the default download folder for the web browser, which on Windows is typically C:\Users\<username>\Downloads.
While the download is in progress, the browser displays a progress indicator. On a typical home broadband connection, the 300-megabyte file completes in two to five minutes. On a slower connection, the download may take ten to fifteen minutes. The download can be paused and resumed if the connection is interrupted.
File integrity
The Blender Foundation publishes a SHA-256 hash for every release. Advanced users who want to verify the downloaded file has not been corrupted in transit can compare the hash of the downloaded file against the published hash. On Windows, the Get-FileHash PowerShell command produces the hash. For a typical home installation this verification step is not required, but it is documented for completeness.
Step 4 — Run the installer
Open File Explorer, navigate to the Downloads folder, and double-click the .msi file. Windows may display a User Account Control prompt asking for permission to make changes to the device. Click "Yes" to allow the installer to proceed.
The installer presents a sequence of screens:
- Welcome screen — Click "Next."
- License agreement — Read the GNU General Public License, check the box that confirms acceptance, and click "Next."
- Custom setup — The default install location is
C:\Program Files\Blender Foundation\Blender X.X\. Accept this default. Do not change the install directory unless a specific reason exists. - Ready to install — Click "Install."
- Completion screen — Click "Finish."
The installation takes approximately two minutes on a computer with a solid-state drive. On a computer with a traditional spinning hard disk, the installation can take five to seven minutes. The installer's progress bar updates in real time, so the reader can see whether the installation has stalled.
Default install location
The default install location of C:\Program Files\Blender Foundation\Blender X.X\ is the correct choice. The 57 Studios documentation assumes this location when referencing Blender's executable path.
Pro tip
The installer does not create a checkbox to launch Blender on the final screen. After clicking Finish, the installer closes and the next step must be performed from the desktop shortcut. This differs from some other applications, which include a launch option at the end of the installer.
Step 5 — Launch Blender for the first time
After the installer finishes, a shortcut named "Blender" appears on the desktop and inside the Windows Start menu. Double-click the desktop shortcut, or press the Windows key, type "Blender," and press Enter.
The first launch takes longer than subsequent launches because Blender compiles its shader cache. A splash screen appears in the center of the screen with options for "Quick Setup." Accept the default keymap, the default theme, and the default mouse settings. Click anywhere outside the splash screen to dismiss it.
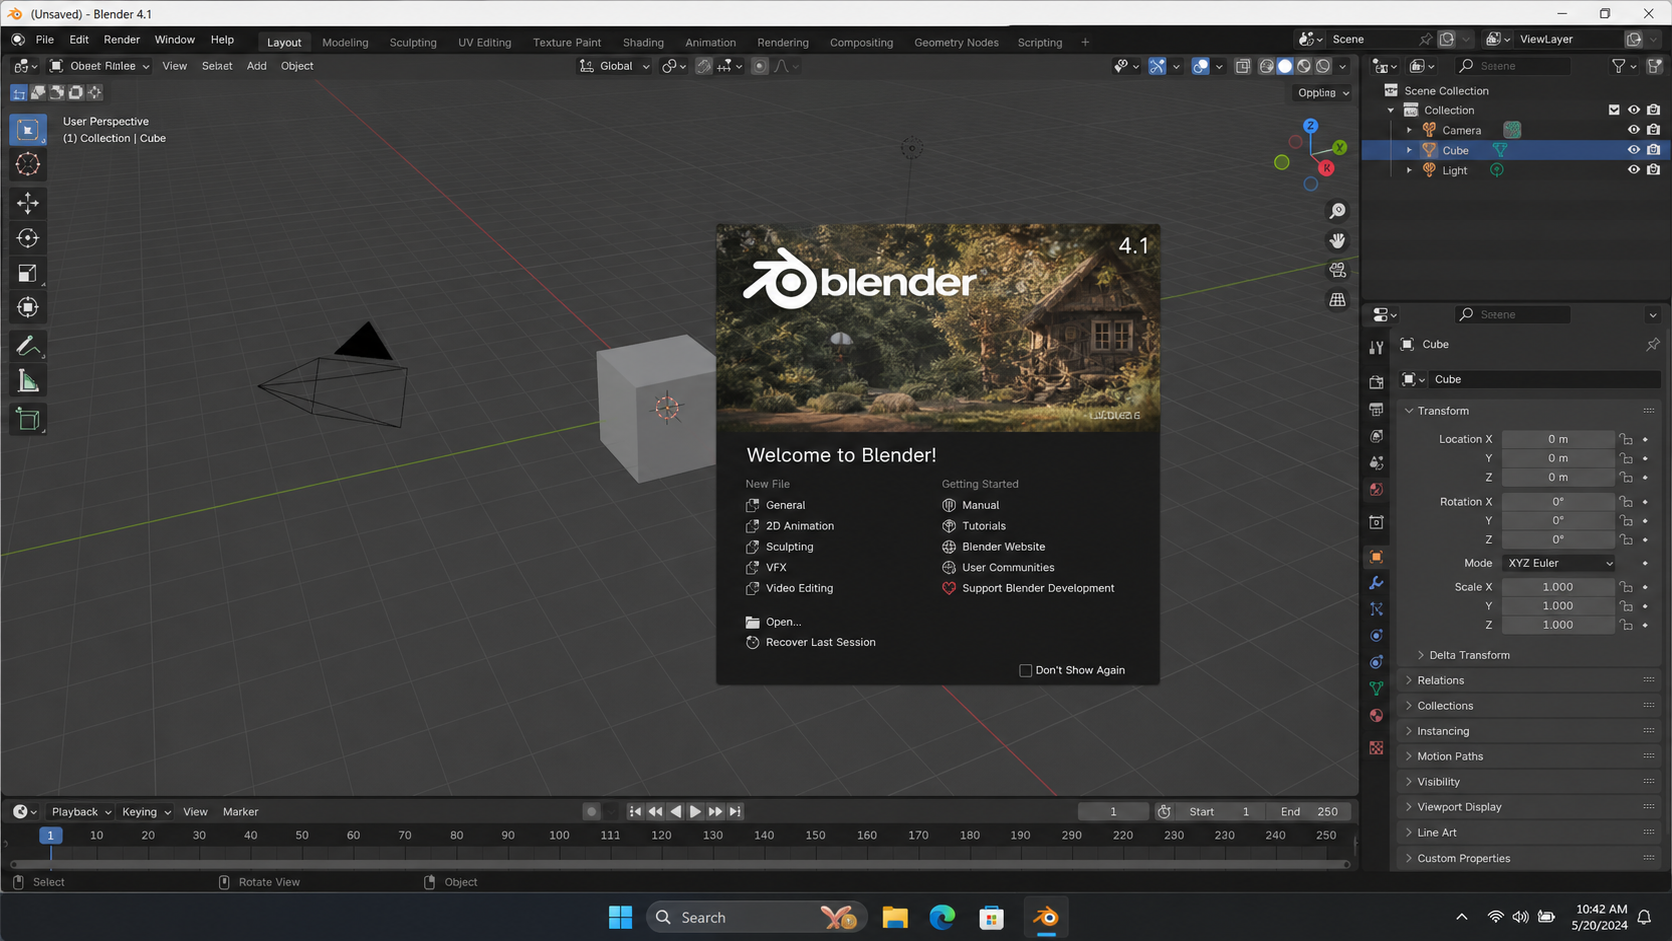
Confirm the installation
The default scene contains a cube, a camera, and a light. If those three objects are visible in the viewport, the installation succeeded.
First-launch shader compilation
The shader cache is a collection of precompiled shader programs that Blender uses to render the viewport. The first time Blender launches, the cache is empty and Blender compiles the shaders on demand. The cache is stored in the user preferences folder, so subsequent launches reuse the cached shaders and are much faster. If Blender is updated to a new version, the shader cache may be rebuilt the first time the new version launches.
Step 6 — Verify the installed version
Once Blender is open, the version number is displayed in the bottom right corner of the splash screen and in the title bar of the main window. To confirm the version through the menu, click the Blender logo in the top left of the main window and choose "About Blender." A dialog opens listing the version number, the build hash, the build date, and the build platform.
Compare the displayed version number against the version that was selected on the download page. The two should match. If they do not, the installer that was downloaded was not the installer that was selected. This rarely happens, but is worth checking when the download was interrupted or when multiple browser tabs were open during the download.
Which release professional modders use
The following distribution reflects the release preference reported by active Unturned modders in the 57 Studios community survey conducted in early 2026.
The LTS release is the majority choice because it remains stable across the multi-month duration of a typical mod project. Modders who follow new Blender features closely tend to install the current release alongside the LTS release rather than replacing it.
The custom build category in the chart above refers to modders who compile Blender from source. Compiling from source is a rare workflow that allows the modder to enable experimental features that are not yet present in any released build. The 57 Studios documentation does not cover compiling from source.
Decision flowchart — which release to install
The flowchart above is the single recommended path for a new modder. The path terminates in the LTS release for any new modder who is not already invested in a project on a different release.
Disk space and installation footprint
The Blender installer claims approximately 300 megabytes during download. The installed application uses approximately 750 megabytes on disk, because the installer extracts additional files and shaders that are not included in the compressed installer. The user preferences folder, which is created on first launch, adds another 50 to 200 megabytes depending on the number of add-ons and templates installed.
| Storage location | Typical size | Purpose |
|---|---|---|
| Installer file (Downloads folder) | 300 MB | The .msi installer; can be deleted after install |
| Program files folder | 750 MB | The Blender application and bundled resources |
| User preferences folder | 50-200 MB | Per-user settings, add-ons, shader cache |
| Default scene autosave folder | 5-50 MB | Temporary scene snapshots created during work |
| Total footprint after first session | 1.1-1.3 GB | Approximate sum of all the above |
The footprint is small compared with the typical disk capacity of a modern computer. A 256-gigabyte solid-state drive can hold dozens of Blender installations alongside the operating system. The footprint becomes a concern only on heavily-loaded laptops with smaller drives, in which case the user preferences folder can be moved to an external drive using the file path setting described in the Advanced considerations section.
System memory and graphics requirements
Blender's minimum system requirements are modest by modern standards. The viewport renders smoothly on most computers manufactured in the last five years. The following table summarizes the minimum, recommended, and optimal specifications published by the Blender Foundation, with annotations added by the 57 Studios documentation team.
| Component | Minimum | Recommended | Optimal |
|---|---|---|---|
| Operating system | Windows 10 64-bit | Windows 10 or 11 64-bit | Windows 11 64-bit |
| Processor | 2-core 64-bit Intel or AMD | 4-core | 8-core or more |
| System memory | 8 GB | 16 GB | 32 GB or more |
| Graphics card | OpenGL 4.3 with 2 GB VRAM | OpenGL 4.3 with 4 GB VRAM | OpenGL 4.3 with 8 GB VRAM |
| Display resolution | 1280x768 | 1920x1080 | 2560x1440 or higher |
| Storage | 3 GB free for application | 50 GB free for projects | 250 GB or more on SSD |
| Pointing device | Three-button mouse | Three-button mouse with scroll wheel | Three-button mouse plus graphics tablet |
A new modder who is using a computer that meets the minimum specification will be able to complete every exercise in the 57 Studios Blender setup track. The recommended specification produces a noticeably smoother viewport, and the optimal specification supports the larger scenes that experienced modders eventually build.
The below-minimum category in the chart above corresponds to modders who are using older hardware than the published minimum. These modders report longer viewport stutters and slower file opens, but most of them complete their projects without changing hardware. Blender's developers prioritize backward compatibility, so even older systems remain usable for some time after the published minimum specification advances.
Operating system compatibility
Blender is distributed for Windows, macOS, and Linux. The 57 Studios Blender setup track documents the Windows path because Windows is the most common platform among 57 Studios contributors. The macOS path is similar but uses a .dmg archive rather than a .msi installer, and the Linux path uses a tarball or a distribution-specific package.
| Platform | Installer format | Default install location |
|---|---|---|
| Windows | .msi | C:\Program Files\Blender Foundation\Blender X.X\ |
| macOS | .dmg | /Applications/Blender.app |
| Linux (tarball) | .tar.xz | User-selected; commonly ~/blender-X.X/ |
| Linux (Snap) | snap install | /snap/blender/ |
| Linux (Flatpak) | flatpak install | /var/lib/flatpak/app/ |
The choice of platform does not affect file compatibility. A .blend file saved on Windows opens without modification on macOS or Linux. An FBX exported from Blender on any platform imports into Unity on any platform.
Pre-install checklist
Before launching the installer, confirm the following:
| Item | How to confirm | Pass criteria |
|---|---|---|
| Operating system | Win+R, type winver, press Enter | Windows 10 or 11 |
| Memory | Task Manager → Performance → Memory | 8 GB or more |
| Disk space | File Explorer → This PC → C: drive | 3 GB free at minimum |
| Graphics driver | Device Manager → Display adapters | Driver dated within the last 12 months |
| Internet connection | Open a browser, load any web page | Page loads within five seconds |
| Administrator account | Settings → Accounts → Your info | "Administrator" listed under account type |
| Three-button mouse | Visual inspection | Scroll wheel can be pressed in like a button |
If any item in the checklist fails, address the failure before proceeding. Most failures are quick to resolve: a graphics driver update from the manufacturer's website, a disk cleanup to free space, or a switch to an account with administrator privileges.
Advanced considerations
Installing multiple versions side by side
Blender supports installing multiple versions on the same computer. Each version installs into its own folder under C:\Program Files\Blender Foundation\ and creates its own user preference folder under C:\Users\<username>\AppData\Roaming\Blender Foundation\Blender\<version>\. A modder can install the LTS release for production work and the current release for experimentation without conflict.
To launch a specific version when multiple are installed, use the version-specific shortcut in the Start menu. The shortcuts are named with the version number, such as "Blender 4.2" and "Blender 4.5." The most recent version installed claims the file association for .blend files, so double-clicking a .blend file in File Explorer opens that version. To open a file in a different version, right-click the file, choose "Open with," and select the desired version.
Portable installation
The Blender Foundation also distributes a portable ZIP archive on the same download page. The portable version does not require administrative privileges to install. Extract the ZIP to any folder, then run blender.exe from inside the extracted folder. The portable version is useful on locked-down computers or for testing a release without committing to an installation.
The portable version stores its user preferences in the extracted folder rather than in the system user preferences folder. This means a portable installation on an external drive carries all of its settings with it, which is convenient for modders who move between multiple computers.
Graphics driver requirements
Blender depends on the graphics driver for viewport rendering. If the viewport renders incorrectly, displays artifacts, or fails to launch, update the graphics driver from the manufacturer's website. NVIDIA, AMD, and Intel all publish current drivers on their official support pages.
A driver more than 12 months old is the single most common cause of viewport rendering problems on otherwise compatible hardware. The Blender Foundation publishes a list of known driver issues on the Blender wiki, and the list is updated as new releases of the graphics drivers ship.
Moving the user preferences folder
The user preferences folder defaults to C:\Users\<username>\AppData\Roaming\Blender Foundation\Blender\<version>\. The folder can be moved to a different drive by editing the bundle.txt file inside the installation folder. This is useful when the system drive is small and the user preferences folder has grown large due to many add-ons or a large shader cache.
The move is rarely needed for a new modder. The default location is correct in almost every case. Documentation of the move is included for completeness and for advanced users who manage many installations.
Silent install for managed deployments
The .msi installer supports silent installation via the standard Windows Installer command-line switches. A managed deployment can use msiexec /i blender-X.X-windows-x64.msi /qn to install Blender without user interaction. This is useful for system administrators who manage many workstations.
Silent install is not required for a new modder following this article. The graphical installer described in the step-by-step section is the standard path.
Uninstalling Blender
To uninstall Blender, open Windows Settings, navigate to Apps, find "Blender" in the list, and click "Uninstall." The uninstaller removes the program files but leaves the user preferences folder intact. To remove the user preferences folder, delete C:\Users\<username>\AppData\Roaming\Blender Foundation\Blender\<version>\ manually after the uninstall completes.
Leaving the user preferences folder behind is the default behavior because it preserves the modder's settings, add-ons, and shader cache across a reinstall. A reinstall in the same version picks up exactly where the previous install left off.
Post-install verification checklist
After the installer finishes and Blender launches successfully, complete the following verification steps before moving on to the next article. Each step is short and is intended to surface configuration problems early, before they accumulate into harder-to-diagnose issues.
| Verification step | How to perform | Expected result |
|---|---|---|
| Application launches | Double-click the desktop shortcut | Splash screen appears within 30 seconds |
| Default scene loads | Dismiss the splash screen | Cube, camera, and light visible in viewport |
| Viewport renders | Move the mouse over the viewport | Outline follows the mouse smoothly |
| Menu bar populated | Click File, Edit, Render, Window, Help in turn | Each menu opens and shows expected entries |
| Preferences open | Choose Edit → Preferences | Preferences window opens with sidebar |
| Add-ons list loads | In Preferences, click Add-ons | List of bundled add-ons appears within 5 seconds |
| Save works | Choose File → Save As, save a test .blend file | File appears in chosen folder with .blend extension |
| Reopen works | Close Blender, double-click the saved file | Blender relaunches with the file content |
A pass on every row of the checklist means the installation is complete and the modder is ready to proceed to viewport navigation. A failure on any row should be diagnosed using the troubleshooting section below before moving forward.
Troubleshooting installation problems
The installer reports an error and rolls back
Windows Installer occasionally encounters a conflict with an existing installation, antivirus software, or a corrupted download. To address this:
- Restart the computer to clear any pending Windows Installer locks.
- Disable antivirus software temporarily and rerun the installer.
- Redownload the installer from the official source, in case the original download was incomplete.
- Confirm the user account performing the installation has administrator privileges.
In rare cases the Windows Installer service itself is in an inconsistent state. The service can be restarted from an elevated PowerShell prompt with the command Restart-Service msiserver.
The application fails to launch after a successful install
If the installer reports success but Blender does not launch when the desktop shortcut is double-clicked, the most common cause is an outdated graphics driver. Confirm the driver date in Device Manager. A driver older than 12 months should be updated from the manufacturer's website.
A second common cause is a corrupted shader cache from a prior installation. To clear the shader cache, navigate to C:\Users\<username>\AppData\Roaming\Blender Foundation\Blender\<version>\ and delete the shaders subfolder. Blender rebuilds the cache on the next launch.
The viewport is blank or shows graphical artifacts
A blank viewport almost always indicates a graphics driver problem. Update the driver from the manufacturer's website. If the problem persists, try switching the viewport's drawing API from the default to a different option. Open Edit → Preferences → System and change the Graphics Backend setting. A restart of Blender is required after the change.
The desktop shortcut is missing
If the desktop shortcut did not appear after the installer finished, the shortcut can be created manually. Right-click on an empty area of the desktop, choose New → Shortcut, and enter the path to blender.exe inside the install folder. The default path is C:\Program Files\Blender Foundation\Blender X.X\blender.exe.
The Start menu entry is generated by the installer and should always be present. If the Start menu entry is also missing, the installation did not complete successfully. Rerun the installer.
The installer prompts for a missing dependency
A small number of older Windows installations may prompt for a Visual C++ runtime that is not yet installed. The installer downloads and installs the runtime automatically if an internet connection is available. If the prompt persists, download the Visual C++ Redistributable from Microsoft's official download site and install it before retrying the Blender installer.
Comparison with other modeling applications
For modders evaluating Blender against other three-dimensional modeling applications, the following comparison summarizes the key differences. The comparison is included for context; it is not a recommendation against other applications.
| Application | License | Cost | Industry use | Unturned toolchain support |
|---|---|---|---|---|
| Blender | GNU GPL | Free | Animation, modeling, VFX | Native, recommended |
| Autodesk Maya | Proprietary | Subscription | Animation, film | Indirect via FBX |
| Autodesk 3ds Max | Proprietary | Subscription | Architecture, game art | Indirect via FBX |
| Maxon Cinema 4D | Proprietary | Subscription | Motion graphics, design | Indirect via FBX |
| ZBrush | Proprietary | Subscription | Sculpting | Indirect via FBX |
| Modo | Proprietary | Subscription | Product design, modeling | Indirect via FBX |
| Houdini | Proprietary | Subscription, free Apprentice | Procedural VFX | Indirect via FBX |
Every application in the table can produce an FBX file that Unity will import, but Blender is the only application that the 57 Studios documentation supports directly. A modder using another application can still follow the FBX export article by adapting the dialog labels to their application's terminology.
Workflow placement
This article occupies the third position in the 57 Studios setup track. Unity and the Master Bundle Tool are installed first, because they define the target platform that Blender will export for. Blender's installation is the third step. Viewport navigation and FBX export follow. Notepad++ closes out the setup track, after which the modder is ready to begin authoring an actual mod.
FAQ
Does Blender cost anything? No. Blender is free under the GNU General Public License. There is no trial period and no premium tier. The Blender Foundation accepts voluntary donations through the Blender Development Fund, but contributing is not required to download or use the software.
Can Blender be installed without administrative privileges? The MSI installer requires administrative privileges. The portable ZIP archive does not, so a modder on a managed computer without administrator access can still use Blender by extracting the portable archive to a folder where the user has write access.
Does Blender need to be uninstalled before installing a new version? No. Multiple versions can coexist on the same computer. Each version installs into its own folder and maintains its own user preferences. A modder can install the LTS release for production work and the current release for testing without conflict.
Will Blender work on a computer with integrated graphics? Yes, but performance will be significantly lower than on a computer with a dedicated graphics card. Modeling work is feasible on integrated graphics; rendering work is slow. The viewport may stutter when a scene contains more than a few hundred thousand polygons.
Does Blender require an internet connection after installation? No. Blender runs entirely offline once installed. An internet connection is needed only to download the installer, download optional add-ons, or read documentation hosted on the Blender wiki.
What if my Windows version is older than Windows 10? The current Blender LTS release requires Windows 10 or 11. Older Windows versions are not supported. Older Blender releases that supported Windows 7 and 8 are archived on the Blender Foundation download page, but those releases do not receive security updates and are not recommended.
Is there a mobile version of Blender? No. Blender is a desktop application. A mobile companion application called Blender Companion exists on iOS and Android for reviewing files but it does not support editing.
Can the installer be paused and resumed? The download from the website can be paused and resumed because the browser handles the download. The installer itself, once launched, runs to completion in a single session. There is no resume mechanism for the installer.
Does Blender phone home or send telemetry? Blender does not transmit usage data to the Blender Foundation. The only network activity in a default installation is when the user explicitly checks for updates or downloads an add-on. The Blender Foundation publishes a privacy policy that documents the limited network activity in detail.
How often does the LTS release receive updates? The LTS release receives bug-fix updates approximately every two months for the duration of its two-year support window. Feature updates are not added to the LTS release; only stability and security fixes are included.
What if I downloaded the wrong installer for my system architecture? The Blender Foundation publishes only a 64-bit installer for Windows. There is no 32-bit installer. If a modder has a 32-bit Windows installation, the recommended action is to upgrade Windows to 64-bit, because 32-bit Windows is end-of-life on most modern hardware.
Can I use Blender at work for commercial Unturned mod sales? Yes. The GNU General Public License permits commercial use of Blender and of files created in Blender. The license applies to the application itself, not to the files. A modder can sell mods made in Blender through Tebex or any other platform without owing any license fee.
Best practices
- Install the LTS release unless a specific feature requires the current release.
- Accept the default install location of
C:\Program Files\Blender Foundation\Blender X.X\. - Confirm the installation by launching Blender once before continuing to the next article.
- Keep the installer file in the Downloads folder until the installation is confirmed working. The installer can repair or uninstall the application if needed.
- Update the graphics driver before reporting any viewport rendering problem.
- Complete the post-install verification checklist before moving on to viewport navigation.
- Save the official download page URL as a bookmark for future updates.
- Record the installed version number somewhere the modder can refer to it later, such as in a project README.
Appendix A — File locations after installation
The Windows installer creates files in several locations across the file system. The following table documents the locations a modder may need to know about during the lifetime of an installation.
| Path | Contents | Notes |
|---|---|---|
| C:\Program Files\Blender Foundation\Blender X.X\ | Application executable and bundled libraries | Read-only for non-administrators |
| C:\Program Files\Blender Foundation\Blender X.X\X.X\scripts\ | Bundled Python scripts and add-ons | Modify only with administrator privileges |
C:\Users\<username>\AppData\Roaming\Blender Foundation\Blender\X.X\ | User preferences, user-installed add-ons | Writeable by the user |
C:\Users\<username>\AppData\Roaming\Blender Foundation\Blender\X.X\config\ | Keymap, theme, startup file | Backed up periodically by Blender |
C:\Users\<username>\AppData\Local\Temp\ | Autosave snapshots | Cleared by Disk Cleanup |
| C:\Users\Public\Desktop\ | The Blender desktop shortcut | Created by the installer |
| C:\ProgramData\Microsoft\Windows\Start Menu\Programs\ | The Blender Start menu entry | Created by the installer |
A modder who is troubleshooting an issue is often asked to inspect or modify a file in one of the locations above. The AppData folder is hidden by default in File Explorer; to make hidden folders visible, open View → Show → Hidden items in File Explorer.
Appendix B — Common command-line operations
Blender can be invoked from PowerShell or the command prompt for batch operations. The following commands cover the most useful operations for a modder.
| Command | Purpose |
|---|---|
blender --version | Print the installed version and exit |
blender --help | Print the full help text and exit |
blender file.blend | Open the specified .blend file |
blender -b file.blend -o //render -f 1 | Render frame 1 of the specified file without opening the GUI |
blender -b file.blend --python script.py | Run a Python script against the specified file in headless mode |
blender --factory-startup | Open Blender ignoring all user preferences |
blender --debug | Open Blender with verbose debug output to the console |
Command-line usage is documented for completeness. A new modder does not need to use the command line; the graphical interface covers every operation required to follow the 57 Studios setup track.
Appendix C — Recommended add-ons for Unturned modders
Blender ships with a large number of bundled add-ons. The following table summarizes the bundled add-ons that 57 Studios contributors most commonly enable for Unturned modding work.
| Add-on | Purpose | Bundled |
|---|---|---|
| Import-Export: FBX format | Read and write FBX files | Yes |
| Import-Export: glTF 2.0 | Read and write glTF files | Yes |
| Mesh: Bool Tool | Quick boolean operations | Yes |
| Mesh: LoopTools | Vertex loop manipulation | Yes |
| Object: Bool Tool | Object-level boolean operators | Yes |
| Rigging: Rigify | Quick humanoid rig generation | Yes |
| Add Mesh: Extra Objects | Additional primitive shapes | Yes |
| Add Curve: Extra Objects | Additional curve primitives | Yes |
| 3D View: Stored Views | Save and recall viewport states | Yes |
| Node: Node Wrangler | Faster shader and compositor workflow | Yes |
Each add-on is enabled by opening Edit → Preferences → Add-ons, searching the list for the add-on by name, and checking the checkbox next to its entry. The enabled state persists across Blender sessions automatically. There is no need to re-enable an add-on on every launch.
Appendix D — Keyboard shortcuts visible in the first session
The 57 Studios documentation covers the full keyboard shortcut reference in the viewport navigation article. The following short table lists only the shortcuts that a modder needs during the first launch, before viewport navigation has been studied in depth. Memorizing these eight shortcuts is enough to dismiss the splash screen, save a file, and quit the application cleanly.
| Shortcut | Action |
|---|---|
| Click outside splash | Dismiss the splash screen |
| Ctrl+S | Save the current file |
| Ctrl+Shift+S | Save the current file as a new name |
| Ctrl+O | Open an existing file |
| Ctrl+N | Create a new file with the default scene |
| Ctrl+Z | Undo the last action |
| Ctrl+Shift+Z | Redo the last undone action |
| Ctrl+Q | Quit Blender (with a save prompt) |
The shortcut list is short by design. A new modder is not expected to memorize the full keyboard reference until viewport navigation, modeling, and export workflows have been practiced.
Appendix E — Update cadence and version planning
Blender follows a predictable release cadence. The current release ships every three months. The LTS release ships every twelve months and receives bug-fix point releases every two months for two years. The cadence is published on the Blender Foundation roadmap and is rarely missed.
| Release type | Cadence | Support window | Recommended action |
|---|---|---|---|
| Current release | Every 3 months | Until next current release | Install for cutting-edge work |
| LTS release | Every 12 months | 2 years from release | Install for production work |
| LTS point release | Every 2 months | Same as parent LTS | Update opportunistically |
| Alpha builds | Continuous | None | Skip unless contributing to development |
| Beta builds | 6-8 weeks before release | None | Skip unless previewing a feature |
| Release candidate | 2 weeks before release | None | Skip unless verifying compatibility |
A modder planning a multi-month project should target the LTS release that is current at the start of the project. Subsequent point releases within the same LTS line can be applied during the project without disrupting workflow. A switch between LTS lines mid-project should be deferred until the project ships.
Appendix F — Quick reference card
The following condensed reference summarizes the entire installation procedure on a single block. Print this section and keep it next to the computer during the first installation.
| Step | Action | Confirmation |
|---|---|---|
| 1 | Open https://www.blender.org/download/ in a browser | The page loads with a large blue download button |
| 2 | Choose LTS or current; the LTS is recommended | The version number appears below the button |
| 3 | Click the download button | A .msi file appears in Downloads |
| 4 | Double-click the .msi file in Downloads | The installer welcome screen appears |
| 5 | Accept defaults through the installer | The completion screen reports success |
| 6 | Click Finish | The installer window closes |
| 7 | Double-click the Blender desktop shortcut | The splash screen appears |
| 8 | Click outside the splash screen | The default scene with cube, camera, light appears |
| 9 | Choose Edit → Preferences | The preferences window opens cleanly |
| 10 | Close Blender by choosing File → Quit | Blender closes without errors |
A pass on all ten rows means the installation is complete and the modder is ready to proceed to the next article in the 57 Studios setup track.
Glossary
The following terms are used in this article and in the 57 Studios Blender setup track. The definitions are intentionally brief; deeper explanations appear in the articles where each term is first used in context.
| Term | Definition |
|---|---|
| LTS | Long-Term Support. A release line that receives stability fixes for two years and no feature additions. |
| Current release | The most recent feature-complete release of Blender. Ships every three months. |
| MSI | Microsoft Installer. The file format used for the Windows installer. |
| GNU GPL | The license under which Blender is distributed. Permits free use, modification, and commercial redistribution. |
| Shader cache | Precompiled shader programs stored on disk to speed subsequent application launches. |
| Add-on | A Python script that extends Blender's functionality. Bundled add-ons ship with the installer. |
| User preferences folder | The per-user folder where Blender stores settings, keymaps, themes, and add-ons. |
| Splash screen | The dialog that appears on first launch, presenting Quick Setup options and recent files. |
| Default scene | The scene that appears when Blender starts without an existing file. Contains a cube, a camera, and a light. |
| Viewport | The large three-dimensional window in the center of the application where modeling takes place. |
The full glossary is maintained in the 57 Studios documentation index. Each article includes the terms relevant to its scope.
How a fresh installation maps to the modder's workflow
The Blender installation is the third step in the 57 Studios setup track, but it has the longest lifespan of any step. Unity may be updated as new versions ship. Notepad++ may be reinstalled when a new computer is set up. Blender, once installed, typically remains in place for the full duration of a multi-month or multi-year mod project. For this reason, the time spent on a correct first installation pays dividends across the entire mod-development workflow.
The following sequence diagram traces the relationship between the install step and the steps that follow.
The diagram emphasizes that a successful installation is the gate to all subsequent modeling and export work. A modder who skips the verification checklist at the install stage may not discover a problem until much later, when an unrelated symptom appears during modeling or export. Catching problems at the install stage is the cheapest stage to catch them.
Comparing the LTS release across years
The LTS release line has been maintained continuously since 2021. Each LTS line receives two years of support, and a new LTS line begins each year. The following table summarizes the LTS lines that are recent enough to be relevant to a modder beginning work in 2026.
| LTS line | Initial release | End of support | Notable changes since previous LTS |
|---|---|---|---|
| 2.93 LTS | June 2021 | June 2023 | Geometry Nodes introduction, Asset Browser preview |
| 3.3 LTS | September 2022 | September 2024 | Procedural hair, library overrides, performance improvements |
| 3.6 LTS | June 2023 | June 2025 | Simulation Nodes, Light Linking, Cycles GPU improvements |
| 4.2 LTS | July 2024 | July 2026 | Extensions platform, EEVEE Next, improved Greasy Pencil |
A new modder beginning in 2026 should install the most recent LTS line that still has remaining support. As of the writing of this article, the 4.2 LTS line is the recommended choice. Subsequent LTS lines will replace 4.2 as their initial releases ship.
Two recurring decisions during the installation
Two decisions during the install are worth highlighting because they cause the most confusion among new modders.
Decision 1: Which release to download. The download page presents both the current release and the LTS release. The current release looks more attractive because the version number is higher. The LTS release is the correct choice for new modders because it minimizes the chance of encountering documentation that references a feature that has moved or been renamed. This article has emphasized this point multiple times for that reason.
Decision 2: Where to install. The installer offers a Custom Setup screen that allows the install location to be changed. The default location is C:\Program Files\Blender Foundation\Blender X.X\. A new modder is sometimes tempted to change this location to a separate drive to save space on the system drive. The recommendation is to accept the default. The 57 Studios documentation references the default location throughout, and changing the location creates a small but persistent friction every time a documented path needs to be adapted to the modder's installation.
Decision discipline
For a new modder, the two decisions above are the only configuration decisions during the entire installation. Every other screen in the installer can be passed through with the Next button. Resist the urge to customize on the first installation. Once the modder has used Blender for a few months and has a clear reason to deviate from the defaults, the time to customize will have arrived.
Installation timing benchmarks across hardware tiers
To set expectations for the time the installation will take, the 57 Studios documentation team measured the install duration across a small panel of representative hardware configurations. The panel is not exhaustive, but it covers the range of hardware that 57 Studios contributors typically use.
| Hardware tier | Storage | Time to download | Time to install | Total elapsed |
|---|---|---|---|---|
| Modern desktop (8-core, NVMe SSD) | NVMe SSD | 1 min 20 sec | 1 min 10 sec | 2 min 30 sec |
| Modern laptop (6-core, SATA SSD) | SATA SSD | 1 min 45 sec | 1 min 30 sec | 3 min 15 sec |
| Older desktop (4-core, SSD) | SATA SSD | 2 min 10 sec | 2 min 0 sec | 4 min 10 sec |
| Older laptop (4-core, HDD) | Spinning HDD | 2 min 30 sec | 5 min 45 sec | 8 min 15 sec |
| Minimum specification | Spinning HDD | 3 min 0 sec | 7 min 30 sec | 10 min 30 sec |
The download time is dominated by the speed of the internet connection. The install time is dominated by the speed of the storage device. A modder with a spinning hard disk drive should expect the install to take noticeably longer than a modder with a solid-state drive, but the install will complete in both cases.
The pie chart above shows the time distribution across the full procedure including the post-install verification checklist. The download and the install dominate the wall-clock time, but the verification checklist is where the modder confirms the install actually succeeded. Skipping the verification step is a common cause of confusion later in the workflow, when a problem that was present from install time surfaces during modeling.
What to do immediately after the first successful launch
Once the splash screen has been dismissed and the default scene is visible, the modder is positioned to begin the next article. Before moving on, the following short list of housekeeping actions is recommended. None of the actions are required, but each one removes a small friction point later.
- Save a fresh
.blendfile to a known location, such asDocuments\Blender Projects\test.blend, to confirm that File → Save As works. - Reopen the saved file from File → Open Recent to confirm that the recent files list populates correctly.
- Open Edit → Preferences and skim each tab to become familiar with where the major settings live. No changes need to be made yet.
- Open the Outliner panel in the upper right of the default layout and confirm that the Camera, Cube, and Light entries appear as expected.
- Open the Properties panel in the lower right and click through the icons in its left edge. Each icon opens a different category of properties. The names of the categories are useful to remember for later articles.
- Note the version number in the bottom right corner of the splash screen so it can be referenced when reading the 57 Studios documentation.
Housekeeping benefits
Each of the housekeeping actions above takes less than 30 seconds and surfaces the file save path, the recent files list, the preferences window, the Outliner panel, and the Properties panel. These five locations are referenced in every subsequent article in the 57 Studios Blender setup track. Familiarizing oneself with them now means the next article does not need to slow down to explain where they are.
The default Blender layout has remained stable across many LTS releases. A screenshot of the layout in the 4.2 LTS release would be substantially similar to a screenshot of the layout in the 3.6 LTS or 3.3 LTS release. This stability is one of the reasons the LTS line is recommended for new modders following the 57 Studios documentation.
A note on the screenshot conventions used in this article
The screenshots in this article were captured against the 4.2 LTS release of Blender running on a Windows 11 computer with the default theme. A modder using a different version may notice small visual differences from the screenshots, such as a slightly different button color, a renamed menu entry, or a relocated option in the preferences window. The 57 Studios documentation team updates the screenshots when a new LTS release ships, but there is occasionally a delay between the release of a new LTS and the publication of updated screenshots.
If a screenshot in this article does not match what the modder sees on screen, the recommended action is to look for a control with the same name, ignoring small visual differences. The Blender Foundation maintains naming consistency across releases even when visual styling changes. A control named "Limit to Selected Objects" in the 3.6 LTS release is also named "Limit to Selected Objects" in the 4.2 LTS release.
The screenshot convention used throughout the 57 Studios Blender setup track is the default theme, a 1920x1080 resolution, and a maximized application window. Modders working at a different resolution may see panels arranged differently, but the underlying controls remain in the same relative positions.
Installation record-keeping
After the installation is verified, a small amount of record-keeping pays off across the lifetime of the install. The recommended practice is to maintain a single text file in the modder's documents folder that records the following items.
| Item | Example value | Why it matters |
|---|---|---|
| Installed version | 4.2.5 LTS | Reproduces the install on a new computer |
| Install date | 2026-05-17 | Reveals how stale the installation is |
| Install location | C:\Program Files\Blender Foundation\Blender 4.2\ | Useful when troubleshooting paths |
| User preferences folder | C:\Users\Butter\AppData\Roaming\Blender Foundation\Blender\4.2\ | Backup target |
| Enabled add-ons | FBX, glTF 2.0, Node Wrangler | Reproduces the modder's add-on configuration |
| Graphics backend | OpenGL | Useful when reporting viewport problems |
| Graphics driver version | NVIDIA 555.xx | Useful when reporting viewport problems |
The record-keeping file does not need to be elaborate. A plain text file in Notepad++ is sufficient. When a new computer arrives or the modder reformats the existing computer, the file makes it possible to reproduce the installation exactly without trial and error.
Closing notes
A successful Blender installation is a quiet event. The installer closes, the desktop shortcut appears, the splash screen opens, and the default scene loads. No further configuration is required to begin the next article in the 57 Studios Blender setup track. The modder is now equipped to learn viewport navigation, which is the foundation skill on which every subsequent modeling task depends.
If any step in this article did not produce the expected result, return to the troubleshooting section and work through the diagnostics for the failing step. The 57 Studios documentation is intentionally beginner-oriented; every confusing moment encountered during installation is one the documentation team wants to capture and improve. Feedback on this article can be sent to the documentation maintainers through the channels listed in the wiki index.
Next steps
Continue to How to Navigate the Blender Viewport to learn the mouse and numpad controls that allow a modder to move around inside a three-dimensional scene.